

Sherlock
Neurodesk runs on Stanford’s supercomputer “Sherlock” and below are different ways of accessing it.
Using Neurodesk on Sherlock via ssh
Section titled “Using Neurodesk on Sherlock via ssh”Using Neurodesk containers
Section titled “Using Neurodesk containers”Setup your ~/.ssh/config:
Host sherlock ControlMaster auto ForwardX11 yes ControlPath ~/.ssh/%l%r@%h:%p HostName login.sherlock.stanford.edu User <sunetid> ControlPersist yesand then connect to sherlock:
ssh sherlockYou can module use the neurodesk modules (if they have been installed before, see instructions for installing and updating at the end of this page below):
module use $GROUP_HOME/modulesexport APPTAINER_BINDPATH=/scratch,/tmpYou can also add these to your ~/.bash_profile:
echo "module use $GROUP_HOME/modules/" >> ~/.bash_profileecho "export APPTAINER_BINDPATH=/scratch,/tmp,/oak" >> ~/.bash_profilesource ~/.bash_profileNow you can list all modules (Neurodesk modules are the first ones in the list):
ml avOr you can module load any tool you need:
ml fsl/6.0.7.18Submitting a job
Section titled “Submitting a job”Put this in a file, e.g. submit.sbatch:
#!/bin/bash##SBATCH --job-name=test#SBATCH --time=01:00:00#SBATCH --ntasks=1#SBATCH --cpus-per-task=1#SBATCH --mem-per-cpu=2G#SBATCH --output=logs/%x_%j.out#SBATCH --error=logs/%x_%j.err#SBATCH -p normal
module purgemodule use $GROUP_HOME/modules/module load ants/2.6.0ants.... $1
Use sh_part to see which partitions and limits are available:
sh_partPartition choices for Sherlock owners
Section titled “Partition choices for Sherlock owners”Sherlock owners have exclusive access to their own nodes. To submit jobs to those nodes, use the owner’s partition:
#SBATCH -p <partition_name>or on the command line:
sbatch -p <partition_name> submit.sbatchThe partition name is usually the PI’s SUNet ID.
Owners can also submit lower-priority jobs to other owners’ nodes with the shared owners partition:
sbatch -p owners submit.sbatchJobs submitted to -p owners can run on available owner nodes, but they are preemptible. For example, if ownerA’s job is running on ownerB’s node through the owners partition and ownerB submits a job to their own partition, ownerA’s job can be killed so ownerB gets immediate access to their node.
This is useful for less important background jobs that can tolerate interruption. Owners can also continue to use the general pool of nodes, for example with -p normal.
Then submit:
sbatch submit.sbatchOr parallelise across subjects:
for file in `ls sub*.nii`; do echo "submitting job for $file"; sbatch submit.sbatch $file;doneIf you need lots of jobs, consider using array jobs: https://www.sherlock.stanford.edu/docs/advanced-topics/job-management/?h=array+jobs
For example:
#!/bin/bash#SBATCH --job-name=test#SBATCH --time=01:00:00#SBATCH --ntasks=1#SBATCH --cpus-per-task=1#SBATCH --mem-per-cpu=2G#SBATCH --output=logs/%x_%j.out#SBATCH --error=logs/%x_%j.err#SBATCH -p normal#SBATCH --array=1-10
touch test_${SLURM_ARRAY_TASK_ID}
Starting a matlab job:
#!/bin/bash#SBATCH --job-name=invert#SBATCH --time=00:03:00#SBATCH --ntasks=1#SBATCH --cpus-per-task=3#SBATCH --mem-per-cpu=4G#SBATCH --output=logs/%x_%j.out#SBATCH --error=logs/%x_%j.err#SBATCH --partition=normal#SBATCH --mail-type=ALL
module purgemodule load matlabmatlab -batch matlab_file_without_the_dot_m_ending
Check:
squeue -u $USER# orsqueue --me# or to watch it continuously:watch -n 5 "squeue -u $USER"# or get more details:squeue --me -o "%.18i %.9P %.30j %.8u %.8T %.10M %.9l %.6D %.4C %.10m %.12b"# or create an alias:echo 'alias sq="squeue --me -o \"%.18i %.9P %.30j %.8u %.8T %.10M %.9l %.6D %.4C %.10m %.12b\""' >> ~/.bashrcCancel jobs:
scancel <jobid>scancel --name=my_job_nameMore details: https://www.sherlock.stanford.edu/docs/user-guide/running-jobs/#example-sbatch-script
To find out how much resources you need to request for jobs you can use the tool ruse: https://www.sherlock.stanford.edu/docs/user-guide/running-jobs/#sizing-a-job
module load system ruseruse ./myappUsing GUI applications
Section titled “Using GUI applications”First you need to connect to Sherlock with SSH forwarding (e.g. from a Linux machine or from your local neurodesk or from a Mac with XQuartz installed, or from Windows using Mobaxterm)
and then request an interactive job and start the software:
sh_devml mrtrix3mrviewThis runs via X forwarding and doesn’t work well. For a better experience see below how to start a full neurodesktop on Sherlock.
GPU support
Section titled “GPU support”Request a GPU and then add the --nv option:
sh_dev -g 1module load fslexport neurodesk_singularity_opts='--nv'git clone https://github.com/neurolabusc/gpu_test.gitcd gpu_test/etest/bash runme_gpu.shStorage on Sherlock
Section titled “Storage on Sherlock”Here is a great overview of where to store files on Sherlock: https://www.sherlock.stanford.edu/docs/storage/
TLDR:
- important scripts in
$HOME(15GB) - important scripts and software you want to share with your group in
$GROUP_HOME(1TB) - temporary data (deleted after 90 days) goes in
$SCRATCH(100TB) - temporary data (deleted after 90 days) to share with your group in
$GROUP_SCRATCH(100TB) - temporary job data (deleted after job ends) in
$L_SCRATCH(a few TB) - data to keep for a few years in
$OAK(what you pay for, e.g. 20TB). Note: users need to be added to the OAK workgroup: https://workgroup.stanford.edu/ords/regapps/r/wgadmin/inbound?clear=702&p702_wg_id=oak:GROUPNAME - data to archive in ELM (you pay for what you store there)
Use sh_quota to check how much is available:
sh_quotaUsing Neurodesk on Sherlock via OnDemand
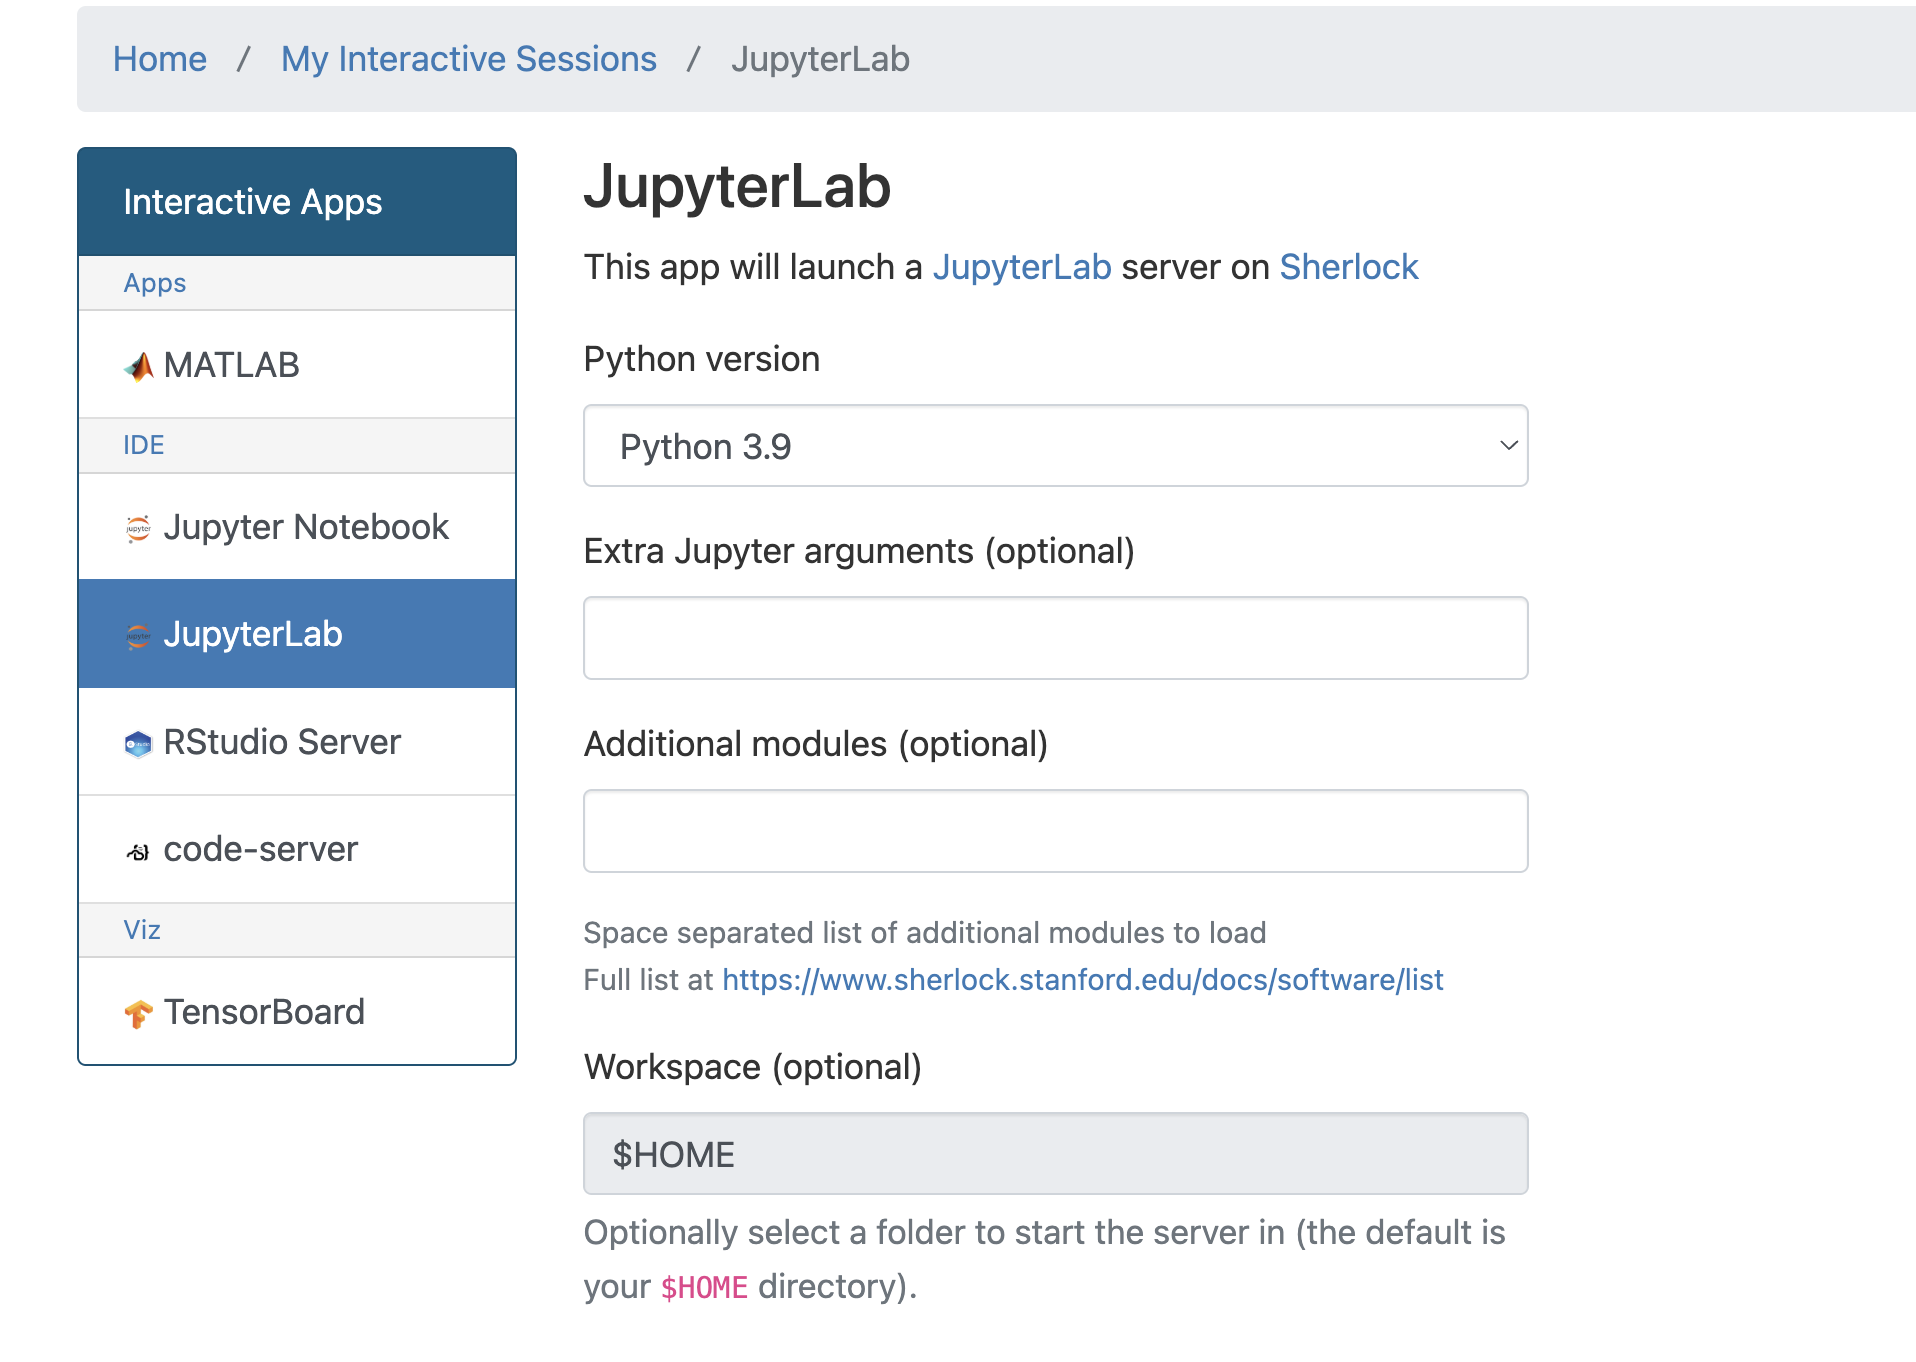
Section titled “Using Neurodesk on Sherlock via OnDemand”Open a JupyterLab session via Open OnDemand.
Make sure to select Python 3.9, otherwise the HPC slurm plugin for JupyterLab will not work.
Installing JupyterLab plugins
Section titled “Installing JupyterLab plugins”Open a terminal in JupyterLab and install:
pip install jupyterlab_niivue ipyniivue jupyterlmod jupyterlab_slurmAfter the installation has finished, restart the JupyterLab session in OnDemand.
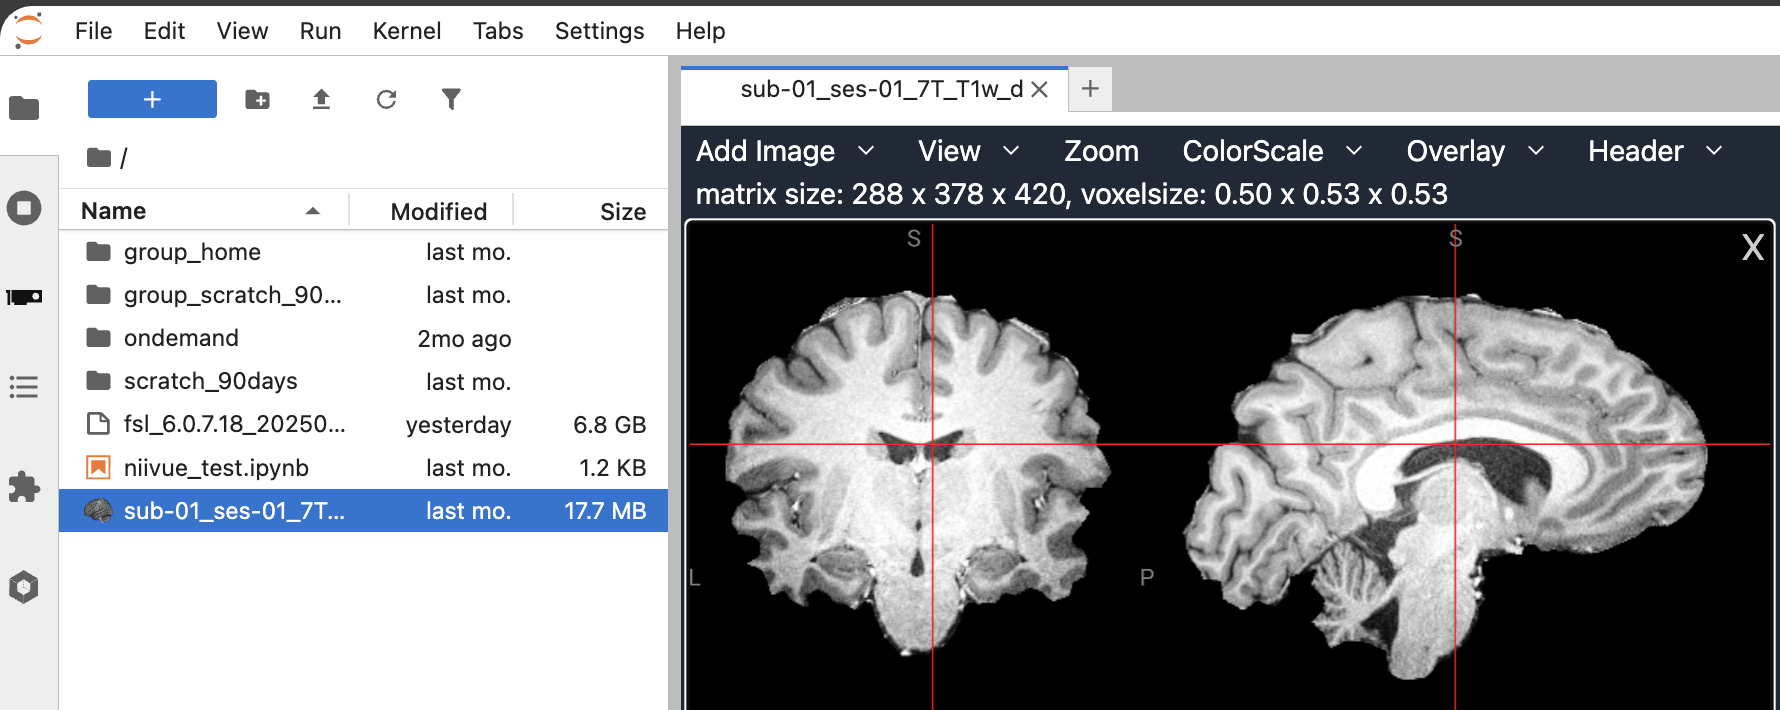
Neuroimaging visualisation in the file browser and notebooks of JupyterLab
Section titled “Neuroimaging visualisation in the file browser and notebooks of JupyterLab”The pip install jupyterlab_niivue added an extension to JupyterLab that visualises neuroimaging data directly via a double-click in the file browser:
Using containers inside a jupyter notebook
Section titled “Using containers inside a jupyter notebook”The install of pip install jupyterlmod made the following possible inside a jupyter notebook:
import osimport lmodgroup_home = os.environ.get("GROUP_HOME", "")os.environ["MODULEPATH"] = os.path.abspath(f"{group_home}/neurodesk/local/containers/modules/")await lmod.load('fsl')Now you can run command line tools in a notebook:
!betUsing niivue inside a jupyter notebook
Section titled “Using niivue inside a jupyter notebook”The install of pip install ipyniivue allows interactive visualisations inside jupyter notebooks. See examples at https://niivue.github.io/ipyniivue/gallery/index.html.
For example:
from ipyniivue import NiiVue
nv = NiiVue()nv.load_volumes([{'path': 'sub-01_ses-01_7T_T1w_defaced_brain.nii.gz'}])nv
Checking on SLURM inside JupyterLab
Section titled “Checking on SLURM inside JupyterLab”The install of pip install jupyterlab_slurm added a plugin that allows monitoring slurm jobs.
Using Neurodesk via a full Neurodesktop session
Section titled “Using Neurodesk via a full Neurodesktop session”This is an ideal setup for visualising results on Sherlock and for running GUI applications. You need to run these commands on your computer (e.g. macOS/Linux/Windows WSL2):
Downloading the startup script
Section titled “Downloading the startup script”curl -J -O https://raw.githubusercontent.com/neurodesk/neurodesktop/refs/heads/main/scripts/connectSherlock.shThe script checks that URL each time it starts and restarts itself if a newer valid copy is available. Copies downloaded before the self-updater was added need this download command once to move onto the automatic update path.
Starting a session
Section titled “Starting a session”bash connectSherlock.shAfter startup, open the printed URL http://127.0.0.1:<random_port>?token=<token> in your browser.
You can submit sbatch jobs from inside this full Neurodesktop session, but make sure that the sbatch job file is stored in a location that’s identical between Neurodesktop and the sherlock cluster, so for example /oak/.... Important: do not submit batch jobs from within the jovyan home directory /home/jovyan as this will not be accessible to slurm on the cluster under that path.
Connecting with VSCode
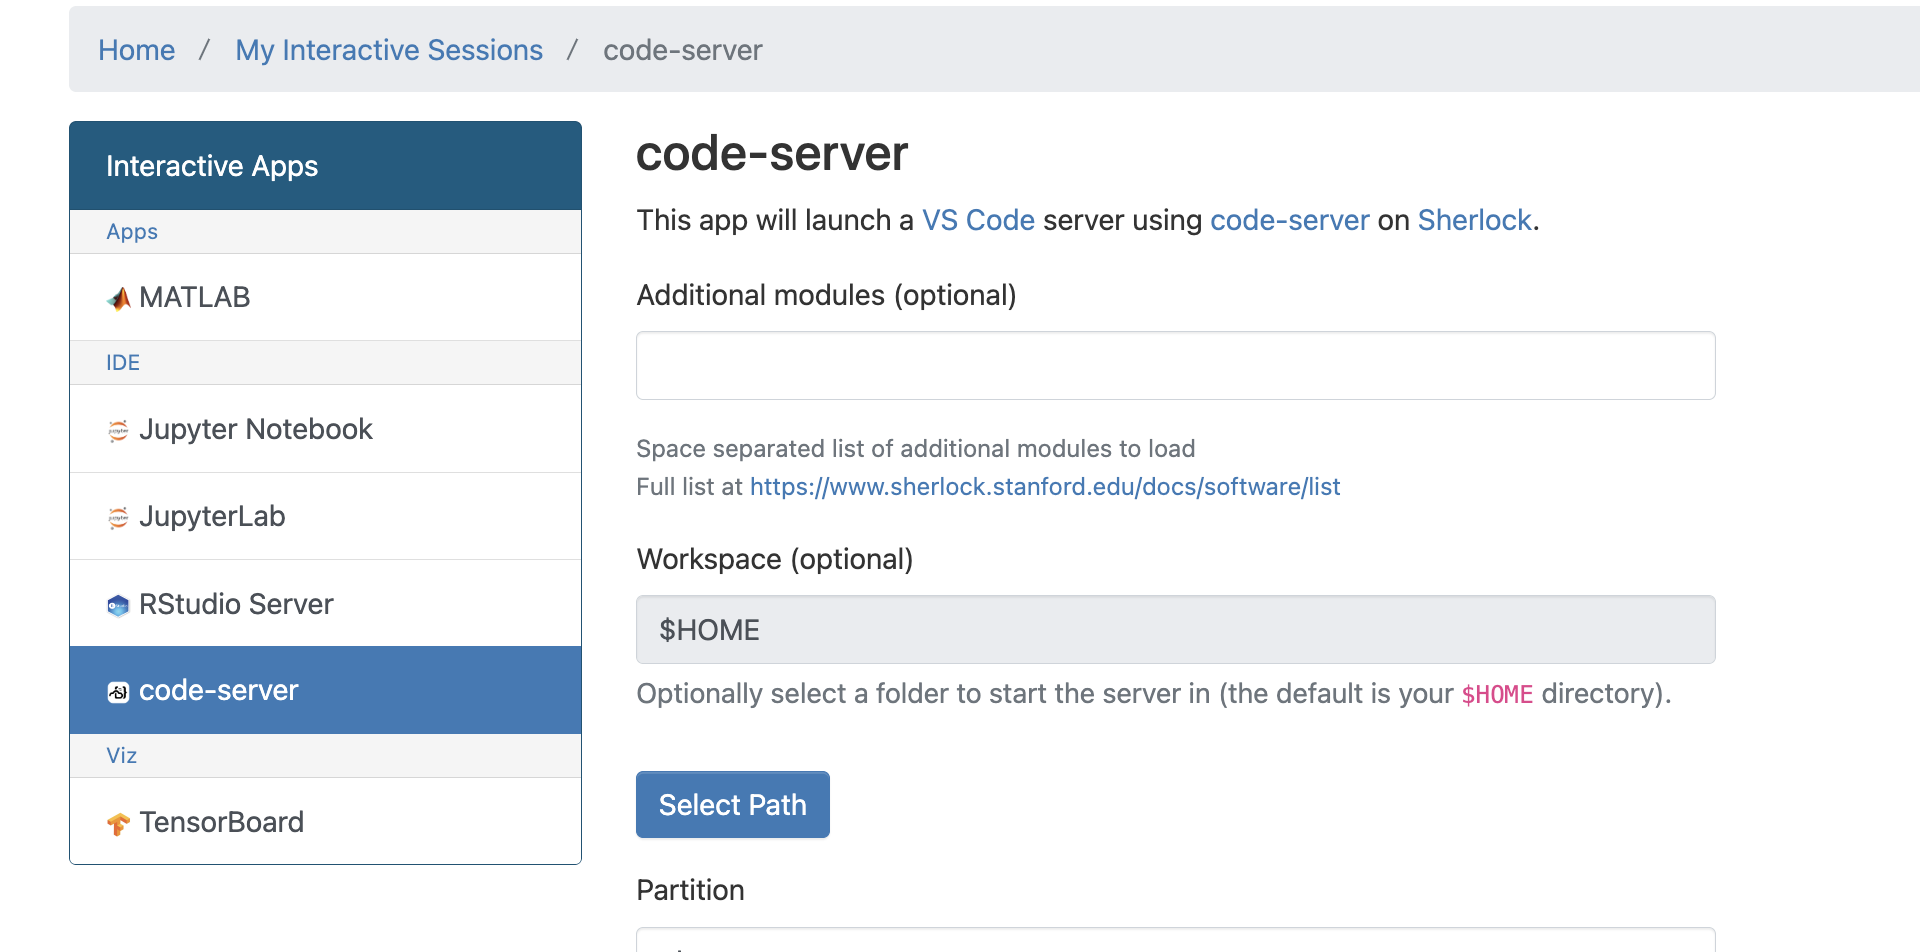
Section titled “Connecting with VSCode”VSCode server does not work on the login nodes due to resource restrictions. It might be possible to run it inside a compute job and inside a container. However, it is possible to run vscode server through OnDemand:
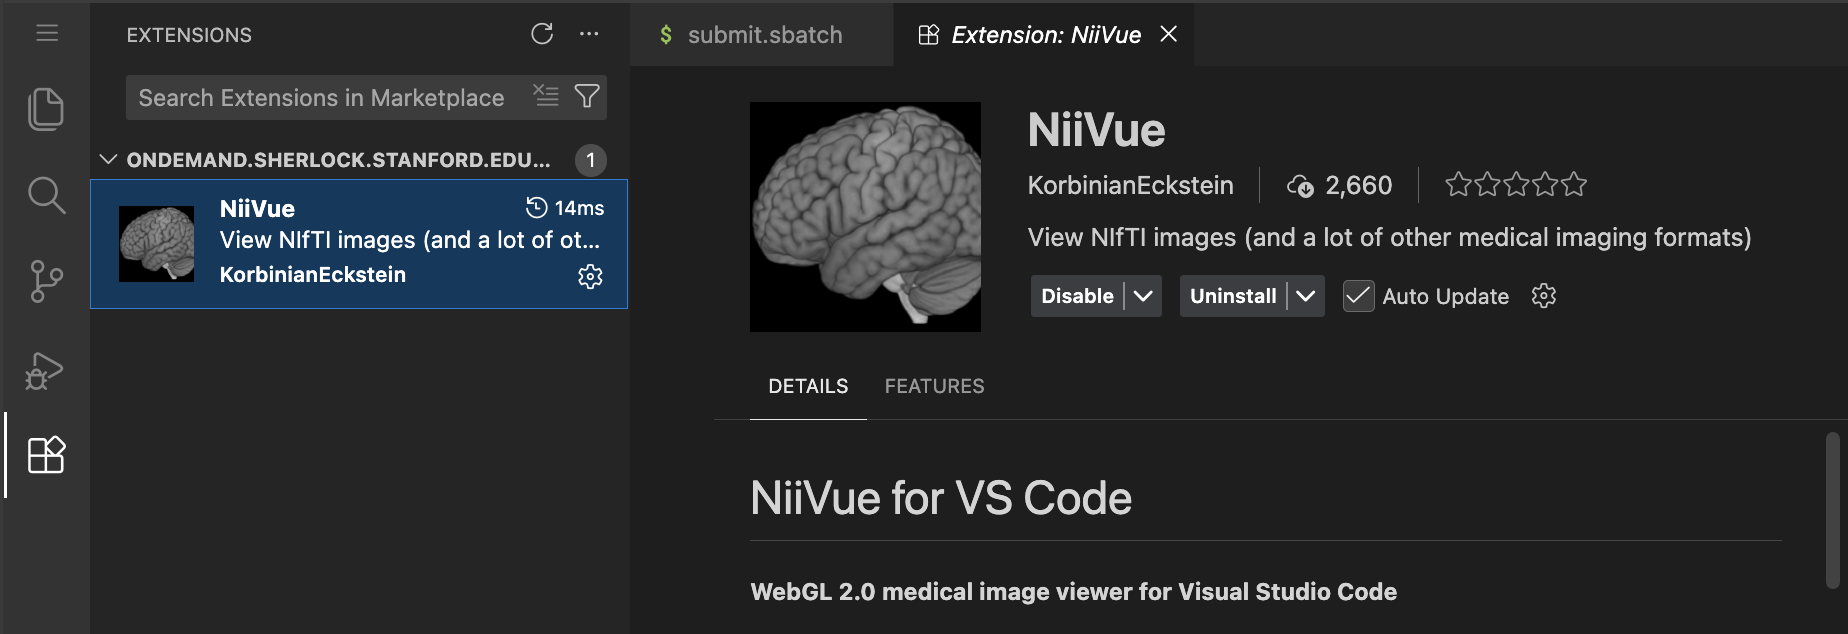
A great extension to install is niivue for vscode which allows visualising neuroimaging data in vscode:
And for AI coding:
- claude code
- gemini CLI companion
- gemini code assist
And for checking on slurm jobs in vscode:
- slurm—
And for matlab scripts:
- MATLAB Extension: download it in a terminal in vscode and then install it through the vscode extension manager:
wget https://github.com/mathworks/MATLAB-extension-for-vscode/releases/download/v1.3.8/language-matlab-1.3.8.vsixUseful shortcuts:
- you can execute a line from your scripts on the terminal via setting a keyboard shortcut to “Terminal: Run Selected Text in Active Terminal”. That makes testing scripts and debugging them quite quick.
Connecting with Cursor
Section titled “Connecting with Cursor”Cursor does not work on the login nodes due to resource restrictions. It might be possible to run it inside a compute job and inside a container, but I didn’t get that to work yet.
Using coding agents on Sherlock
Section titled “Using coding agents on Sherlock”Copilot CLI is an extension of GitHub Copilot that answers natural-language prompts and generates shell commands and code snippets interactively in the CLI. Integrates with developer workflow and git metadata, good at scaffolding repo-level changes. Use this for drafting Slurm scripts, shell-based data-movement commands, Makefiles, container entrypoints, and succinct code edits from the terminal. Caution: always validate generated shell commands before running on Oak.
ml copilot-clicopilotGemini CLI is a CLI assistant that can generate code from Google’s Gemini family of models (via Google Cloud/Vertex AI or client tooling). Provides strong multilingual reasoning and contextual code completion. Use this for translating research intent into cloud and hybrid workflows, generating code for TPU/GPU workloads, and producing infrastructure-as-code snippets that tie to GCP resources. Caution: always confirm data residency and compliance requirements for sensitive data.
ml gemini-cligeminiClaude Code (Claude family) is a coding-specialised variant in the Anthropic Claude model family aimed at code generation, refactoring, and reasoning tasks. Provides conversational reasoning about code, multi-step planning for algorithmic tasks, and safer-response tuning relative to generic models. Caution: check private endpoints/dedicated instances before sending sensitive datasets.
ml claude-codeclaudeCodex is an OpenAI model family good at producing short code snippets, language translations, and API glue, historically the basis for many coding assistants. Use this for scaffold code, translating pseudocode to working scripts, and generating wrappers for system calls and schedulers. Caution: watch out for API hallucinations and insecure shell usage suggestions; verification in GPT-4 (which often supersedes Codex in capability and safety) is advised.
ml codexcodexCrush CLI is an all-around CLI assistant from the Charmbracelet Go-based ecosystem intended to improve interactive developer workflows and scripting. Use it for interactive shells or task runners, pipeline composition for local data preprocessing, productivity (nicer prompts, piping primitives, nicer output formatting), or small automation tasks such as repo tooling and glue scripts.
ml crushcrushFor best neurodesk integration make sure to download Neurodesk’s AGENT.md file and place it in your working directory:
wget https://raw.githubusercontent.com/neurodesk/neurodesktop/refs/heads/main/config/agents/AGENTS.mdNote on miniconda
Section titled “Note on miniconda”We need an older version of Miniconda on Sherlock due to the outdated glibc:
wget https://repo.anaconda.com/miniconda/Miniconda3-py310_23.3.1-0-Linux-x86_64.shbash Miniconda3-py310_23.3.1-0-Linux-x86_64.shNote on MRIQC
Section titled “Note on MRIQC”MRIQC has its $HOME variable hardcoded to be /home/mriqc. This leads to problems. A workaround is to run this before mriqc:
export neurodesk_singularity_opts="--home $HOME:/home"Note on AFNI
Section titled “Note on AFNI”If you are using AFNI then the default detach behaviour will cause SIGBUS errors and a crash. To fix this run AFNI with:
afni -no_detachData transfer
Section titled “Data transfer”Transfer files to and from OneDrive
Section titled “Transfer files to and from OneDrive”First install rclone on your computer and set it up for OneDrive. Then copy the config file ~/.config/rclone/rclone.conf to sherlock. Then run rclone on sherlock:
ml systemml rclonerclone lsrclone copySetting up rclone for OneDrive (needs to be done on a computer with a browser, so not sherlock):
rclone config# select n for new remote# enter a name, e.g. onedrive# select one drive from the list, depending on the rclone version this could be 38# hit enter for default client_id# hit enter for default client_secret# select region 1 Microsoft Global# hit enter for default tenant# enter n to skip advanced config# enter y to open a webbrowser and authenticate with onedrive# enter 1 for config type OneDrive Personal or Business# hit enter for default config_driveid# enter y to accept# enter y again to confirm# then quit config q# now test:rclone ls onedrive:# if it's not showing the files from your onedrive, change the config_driveid in ~/.config/rclone/rclone.confvi ~/.config/rclone/rclone.confMounting sherlock files on your computer through sshfs
Section titled “Mounting sherlock files on your computer through sshfs”Ensure you have brew installed, if not install via:
/bin/bash -c "$(curl -fsSL https://raw.githubusercontent.com/Homebrew/install/HEAD/install.sh)"Install sshfs for your operating system, e.g. on macOS:
brew tap macos-fuse-t/homebrew-caskbrew install fuse-t-sshfsThen mount for macOS:
mkdir ~/sherlock_scratchsshfs <sunetid>@dtn.sherlock.stanford.edu:./ ~/sherlock_scratch -o subtype=fuse-t
mkdir ~/sherlock_oaksshfs <sunetid>@dtn.sherlock.stanford.edu:/oak/stanford/groups/<your_group_here>/ ~/sherlock_oak -o subtype=fuse-t
On Linux:
mkdir ~/sherlock_scratchsshfs <sunetid>@dtn.sherlock.stanford.edu:./ ~/sherlock_scratch
mkdir ~/sherlock_oaksshfs <sunetid>@dtn.sherlock.stanford.edu:/oak/stanford/groups/<your_group_here>/ ~/sherlock_oak
Transfer files using datalad
Section titled “Transfer files using datalad”ml contribsml poldrackml datalad-uvdataladTransfer files via scp
Section titled “Transfer files via scp”# this will transfer a file from your computer to your scratch spacescp foo <sunetid>@dtn.sherlock.stanford.edu:
# this will transfer a directory from sherlock to your computer:scp -r <sunetid>@dtn.sherlock.stanford.edu:/scratch/groups/<your_group_here>/<your_directory_here> .Transfer files via rsync
Section titled “Transfer files via rsync”# this will transfer files from your computer to your scratch spacersync -avP foo <sunetid>@dtn.sherlock.stanford.edu:
# or to oak:rsync -avP foo <sunetid>@dtn.sherlock.stanford.edu:/oak/stanford/groups/<your_group_here>/
# this will transfer a directory from sherlock to your computer:rsync -avP <sunetid>@dtn.sherlock.stanford.edu:/scratch/groups/<your_group_here>/<your_directory_here> .Managing Neurodesk on Sherlock
Section titled “Managing Neurodesk on Sherlock”Installing Neurodesk for a lab
Section titled “Installing Neurodesk for a lab”This is already done and doesn’t need to be run again.
cd $GROUP_HOME/git clone https://github.com/neurodesk/neurocommand.git neurodeskcd neurodeskgit config core.sharedRepository groupchmod -R g+rwX .find . -type d -exec chmod g+s {} +pip3 install -r neurodesk/requirements.txt --userbash build.sh --clibash containers.shexport APPTAINER_BINDPATH=`pwd -P`Installing additional containers
Section titled “Installing additional containers”Check that you have write permissions and can download and install new containers and then run:
ssh sherlocksh_devcd $GROUP_HOME/neurodeskgit pullbash build.shbash containers.sh# to search for a container:bash containers.sh freesurfer# then install the chosen version by copy and pasting the specific install command displayedUpdating the Neurodesktop image
Section titled “Updating the Neurodesktop image”Make sure to set the new version before submitting:
ssh sherlocksbatch -p normal -c 4 --mem=32G --time=04:00:00 --job-name=neurodesktop-update --wrap 'set -e; VERSION="2026-09-07"; : "${GROUP_HOME:?GROUP_HOME is not set}" "${SCRATCH:?SCRATCH is not set}"; cd "${GROUP_HOME}/neurodesk"; export APPTAINER_TMPDIR="${SCRATCH}/apptainer_temp"; mkdir -p "${APPTAINER_TMPDIR}"; image="${GROUP_HOME}/neurodesk/neurodesktop_${VERSION}.sif"; tmp="${GROUP_HOME}/neurodesk/.neurodesktop_${VERSION}.${SLURM_JOB_ID:-$$}.sif"; link="${GROUP_HOME}/neurodesk/neurodesktop_latest.sif"; link_tmp="${link}.${SLURM_JOB_ID:-$$}.tmp"; trap "rm -f \"${tmp}\" \"${link_tmp}\"" EXIT; rm -f "${tmp}" "${link_tmp}"; apptainer pull "${tmp}" "docker://ghcr.io/neurodesk/neurodesktop:${VERSION}"; test -s "${tmp}"; mv -f "${tmp}" "${image}"; ln -s "${image}" "${link_tmp}"; mv -f "${link_tmp}" "${link}"'